

“Work smarter, not harder.” Sounds like something my father or grandfather would tell me, gently chiding me for making something more complicated than it needs to be and then instructing me on a way to do it better, faster, more accurately – or giving me a better tool to do the job. That’s another phrase that I like, “sometimes you need the right tool for the job.” It can sometimes feel that when you need a star head bit screwdriver, all you have is a sledgehammer.
.
What I’ve been learning this past week is to rotate the sledge hammer 90 degrees and use the wider side of the head of the hammer for the initial few swings to get it started, then you can switch and swing a sledgehammer the normal way. Instead of measuring every single piece of rebar and moving and marking each piece, lay the rebar all out on the ground nested adjacent to each other and strike all of the rebar together down a line. Instead of moving a piece into place and measuring to see if it is accurate – have a scrap piece of wood and cut a jig to the correct distance/length and set the jig between pieces of rebar – let that do the measuring for you as accurately as possible every time.
.
This past weekend a small team – Juhee, Matt, Tyler, Yage, and myself bent all of the rebar we would need for the upcoming two weeks – and it was hard work. Juhee and Perry made some beautiful hand drawings of the types of rebar and then on Saturday afternoon we made a plan for Sunday’s afternoon bending session while some of our other classmates finished the concrete pier formwork drawings in studio. I was the one who made the material takeoff on the amount of rebar we would need while making the construction documents, but I didn’t estimate the amount of waste we would have because of purchasing 20′-0″ lengths and having drops of remaining steel – I was just accounting for total linear feet that we would need. It was a humbling lesson to learn when I confessed we would need to purchase more rebar – and Juhee was awesome in helping me calculate how much more we would need to buy.
.
Here is the rebar plan drawing that I drew which was not part of the construction set but initially used to help me with my material takeoff; Juhee and Perry worked on this drawing highlighting the upper right hand corner section to color code the parts we would need; see below similar colors for how we identified the parts – pinks, blues, yellow, orange, greens, and reds. (It doesn’t help that I’m partially colorblind.)

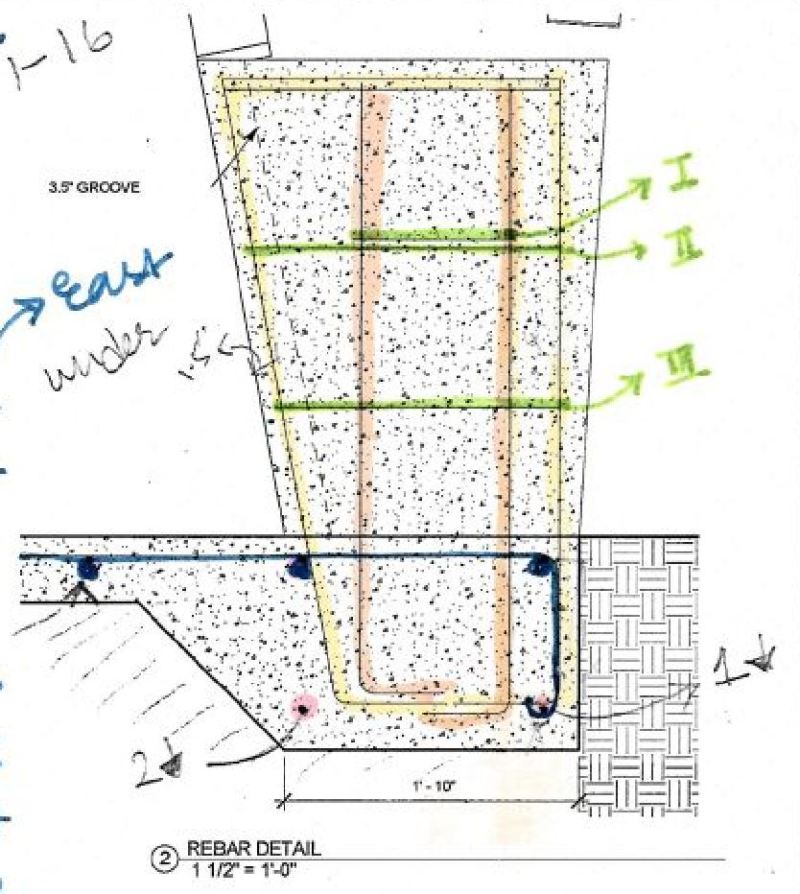
Each type of rebar we would need received a name, and we used this drawing to help bend the rebar in the field:


Here was the plan Juhee and I made on Saturday together; notice how here we started to calculate the amount of drop we would have after cutting the first piece – and then seeing what other pieces we could cut from that drop to minimize waste and use the material we had as efficiently as possible.

Wednesday morning – rebar at the corner of the north west corner of the slab; the vertical members on the right hand side of the photo that I’m holding will extend beyond the limits of the slab for our future concrete piers we will pour next week.

Wednesday morning: here is the north column line and all six of the future columns

Concrete truck rolled around the corner right on time – about 3:00PM on Wednesday and with a flurry of movement we jumped into action. We raked and moved concrete into the turndown of the slab.

Mixing concrete by hand in wheelbarrows.

Floating the concrete to get a smooth finish as the aggregate settles and the water rises to the top. As you can see it is almost sunset here on Wednesday, which worked to our advantage by giving us a longer working time

This is a drawing Yage made last night where we were estimating the amount of rebar chairs we would need for the south side of the concrete slab. We’ll need 60 – we purchased two boxes of 40 to have a few extra.

We talk about sometimes using the right tool for the job; out at Magnolia Park where we built our 1:1 scale mockup, we didn’t have a small rebar tying tool that has a swiveling hook that tapers like a fisherman’s hook – we were using a philips head screw or a metal awl, but this tool improved speed and accuracy:

Last night we set all of the field of rebar into plastic chairs that are designed to hold the concrete to the correct height – these plastic chairs are better than tying the rebar together manually and save time on installation.

Here’s the south portion of the slab with the rebar sticking up on the right hand side of the photo, and you can see it is much cleaner than what we poured on Wednesday. I’m more excited (and less nervous) than I was earlier this week. Photograph by Lynn:

Detail photo that Perry took of the rebar in the middle part of the slab: